Manage facilities
The Facility Information card lists the facilities configured for your organization.
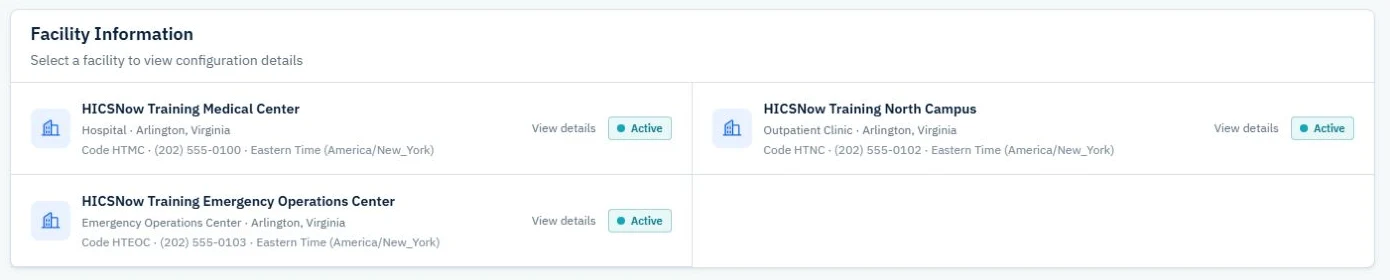
View facility details
- Open the tenant administration dashboard.
- Locate Facility Information.
- Select a facility.
- Review its name, status, type, address, phone, and timezone.
Add a facility
Tenant Administrators can add facilities when the organization uses the Professional or Enterprise plan. Essentials includes one facility, so the Add facility action is not shown for an Essentials organization.
A newly created Professional or Enterprise system may initially show no facilities. Its system name and address remain separate from the facilities it will contain. A Tenant Administrator can add the first facility without being assigned to a facility because the user group has organization-wide administrative access.
- Open the tenant administration dashboard.
- Locate Facility Information and select Add facility.
- Enter the required facility name, code, type, address, city, state, ZIP code, and phone number.
- Review the inferred timezone.
- Select Save.
The new facility becomes available for user assignments, facility contacts, HICS Roles, workspace settings, and future incident operations.
When this is the system's first active facility, saving it completes the organization's initial onboarding. The facility address does not replace the system address.
Edit a facility
- Open the facility detail view.
- Select Edit.
- Update the appropriate fields.
- Select Save.
- Select Back to return to the updated facility detail view when you need to review or continue working with the facility.
Required fields are marked with a red asterisk. Facility name, code, type, address, city, state, ZIP code, and phone must be complete before the record can be saved.
Facility names may be updated without changing the organization's assigned HICSNow address. Facility codes remain unique within the organization.
Changes are recorded in the organization's audit history with the facility name.
Configure the facility location
Facility-location configuration is available with Essentials, Professional, and Enterprise. It is separate from facility weather, which remains available only with Professional and Enterprise.
HICSNow stores a reviewed location so the facility can be identified on maps and used by future location-aware workflows. Professional and Enterprise also use the same coordinates for National Weather Service information in Operational Command. Address matching and the optional pin map are available only while creating or editing a facility.
Use automatic address matching
- Open the facility detail view and select Edit.
- Confirm the required street address, city, state, and ZIP code.
- Select Locate address, or select Open location map to locate an unresolved saved address before the map opens. These actions are deliberate; HICSNow does not look up the address while you type or merely open the editor.
- Review the returned label, coordinates, and marker.
- If the result is marked Approximate, verify the marker carefully.
- Select Save.
HICSNow accepts a U.S. address-level result and displays Location ready with the resolved coordinates. A corrected, estimated, or interpolated result is marked Approximate so an administrator can review it before saving.
A temporary location-service outage never prevents the facility record from being saved. When an unchanged address already has valid coordinates, HICSNow retains them if a later lookup is temporarily unavailable. When a materially changed address cannot be matched clearly, the facility is marked as needing location review so old coordinates are not used for the new address.
Use the location map or custom coordinates
Use a custom location only when the automatic result needs correction or the address cannot be matched clearly.
- Open the facility and select Edit.
- Select Open location map.
- Click the intended point on the map. A click immediately places a custom pin and displays the numeric coordinates. You may also select Place custom pin before clicking when you want the editor to show the coordinate fields first.
- Drag the marker to refine the exact location. Moving the pin changes the coordinates but does not change the facility's postal address.
- Alternatively, enter a latitude from -90 through 90 and a longitude from -180 through 180. These fields remain available if the map cannot load and provide the keyboard-accessible fallback.
- Review the visible coordinates and select Save.
Select Use address location to leave manual mode. HICSNow locates the current postal address again so you can review the automatic marker before saving. Facility-location mode and coordinate changes appear in the existing facility-update audit history.
The map appears only in the facility editor. It is not shown on the read-only Facility card or Incident Overview. Closing the editor also closes the map.
Tenant Administrators can configure every facility in their organization. Facility Administrators can configure only facilities they are permitted to administer. These permissions apply on every subscription plan. Ordinary users cannot edit facility locations. An inactive facility does not supply weather to an active workspace.
See Monitor Facility Weather for the Operational Command display, refresh timing, and stale-data warnings.
Deactivate a facility
Facility deactivation is available only when the organization's subscription plan supports multiple facilities. The single facility included with Essentials must remain active.
- Open the facility detail view and select Edit.
- Clear Facility is active.
- Select Save.
- Review the impact summary and select Deactivate facility.
The confirmation identifies how many active users are assigned to the facility, which accounts will be suspended, and which users need a new primary facility. For every user who will retain access through another active facility, choose a new primary facility from the dropdown before confirming the deactivation. HICSNow applies the primary-facility changes and the facility deactivation together. It preserves the facility, contacts, user assignments, incidents, forms, and audit history.
- Tenant Administrators retain organization-wide access.
- An active Facility Administrator or User assigned only to the inactive facility is signed out, changed to Access suspended, and cannot sign in to that organization.
- A user assigned to another active facility retains organization access, but the inactive facility is removed from the user's active workspace view.
- New invitations, HICS Role assignments, and incidents cannot be assigned to an inactive facility.
Only Tenant Administrators can change facility status from the organization workspace. Facility Administrators may edit permitted facility information but cannot deactivate or reactivate a facility.
Reactivate a facility
- Open the inactive facility and select Edit.
- Select Facility is active.
- Select Save.
Reactivation restores the facility itself. It does not automatically restore a user account that was suspended during deactivation. Review each affected user under Users and select Reactivate user when access should be restored.
Facility information changes appear as Facility updated in audit history. Status changes appear separately as Facility deactivated or Facility reactivated, including the facility, administrator, status transition, and affected-user impact.
Review the facility user roster
- Open the facility detail view.
- Select Users.
- Review the users assigned to the facility.
Each roster entry identifies whether the facility is the user's Primary or Additional assignment. Select a user to open that person's profile.
Add existing users to a facility
Use this workflow when a person already has an active account in the organization. It does not send another invitation or create a duplicate account.
- Open the facility detail view and select Users.
- Select Add users.
- Search the list or review the active users who are not already assigned to the facility.
- Select one or more users.
- Select Add users.
The facility is added as an additional assignment. Use Edit permissions and then Manage facilities from the user's profile when the facility should become the user's primary facility.
Export a facility roster
Open the facility's Users tab and select Export CSV. The file contains the users assigned to that facility and can be used for authorized administrative review outside HICSNow.
Roster additions, assignment changes, and exports are recorded in the organization's audit history.